The Ultimate Backpacker’s Guide to Patagonia
Patagonia. Just saying the name conjures images of jagged granite peaks piercing endless skies, electric blue glaciers calving into turquoise lakes, and winds so fierce they’ll knock you sideways. This vast wilderness straddling Chile and Argentina is a backpacker’s paradise, but it’s also a place that demands respect, planning, and a healthy sense of adventure.
I’ll never forget standing at Laguna de los Tres at sunrise, watching the first rays of light paint Mount Fitz Roy in shades of orange and pink whilst my fingers went numb from the cold. Or hitchhiking along Ruta 40 with a Chilean lorry driver who shared his mate and stories about working on remote estancias. These are the moments that make Patagonia worth every penny, every long bus journey, and every freezing morning in a tent.
This guide covers everything you need to know about exploring Patagonia’s highlights: Torres del Paine, El Chalten, El Calafate, Ushuaia, Puerto Natales, and Punta Arenas. We’ll talk about hiring vehicles, navigating bus routes, hitchhiking, the best hikes, and staying safe in one of the world’s most spectacular wilderness areas.
Places to Explore
Torres del Paine National Park (Chile)
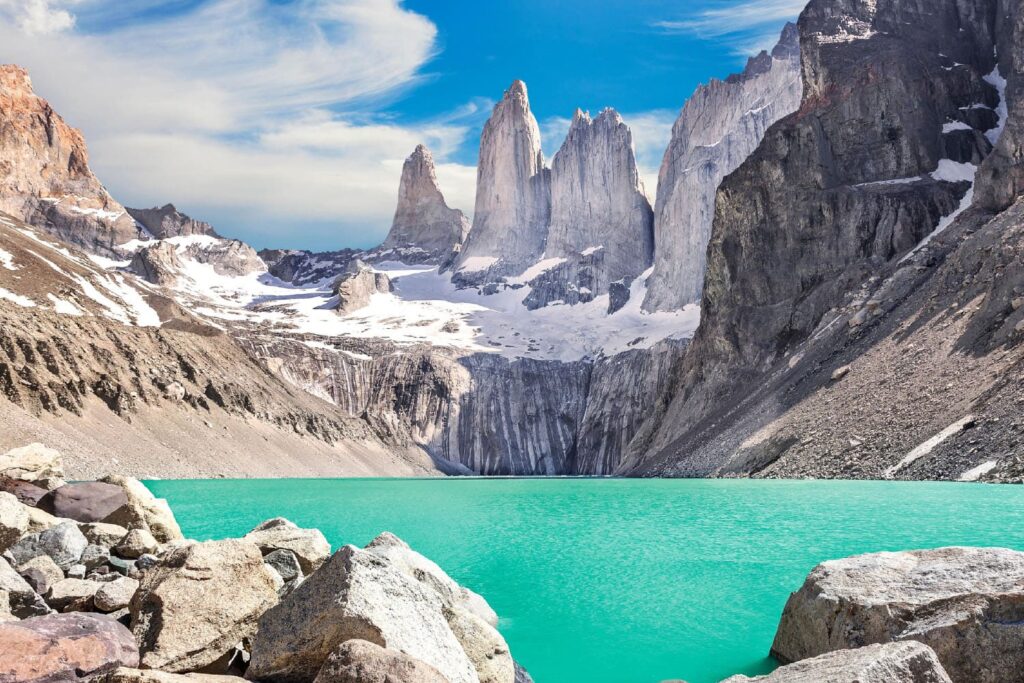
This is Patagonia’s crown jewel. Towering granite spires, electric blue lakes, massive glaciers, and some of the best trekking in South America. The park offers everything from easy lakeside strolls to multi-day wilderness treks.
Entry: Park entrance costs around £25 (21,000 CLP) in high season. You must book accommodation (campsites or refugios) months in advance.
How to Get There:
- Bus from Puerto Natales to Laguna Amarga (main entrance): 1.5-2 hours
- Hire a car from Puerto Natales: 2 hours drive
- Tour operators offer day trips and multi-day packages
Accommodation Base: Stay in Puerto Natales and day-trip, or book campsites/refugios inside the park for multi-day treks.
Puerto Natales (Chile)
A charming small town on the shores of Seno Ultima Esperanza, Puerto Natales is packed with outdoor shops, cosy cafes, and backpacker hostels. It’s the place to organise your Torres del Paine adventure, rent gear, and meet other travellers.
Don’t Miss:
- The waterfront promenade at sunset
- Buying last-minute trekking food at Unimarc supermarket
- Trying local lamb at one of the parrillas
El Calafate (Argentina)
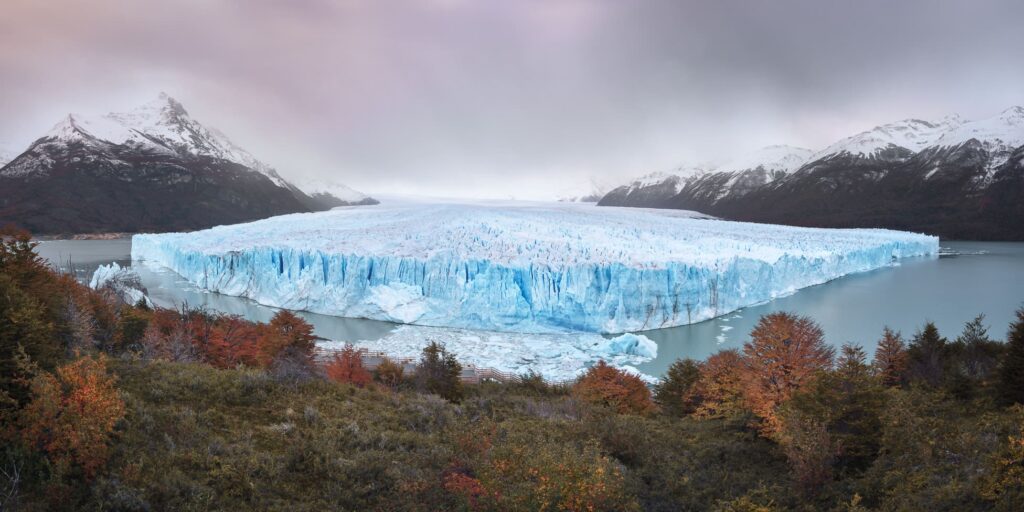
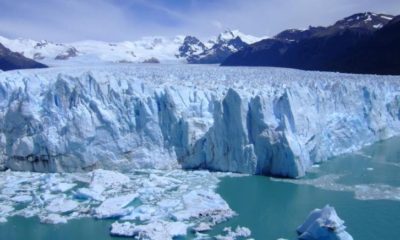
El Calafate is touristy but undeniably convenient, with the stunning Perito Moreno Glacier just an hour away. The glacier is a moving river of ice that regularly calves massive chunks into Lago Argentino with thunderous cracks. Walking the boardwalks to view this natural wonder is unforgettable.
How to Get There:
- Fly from Buenos Aires (3 hours)
- Bus from El Chalten (2.5-3 hours)
- Bus from Puerto Natales (5-6 hours)
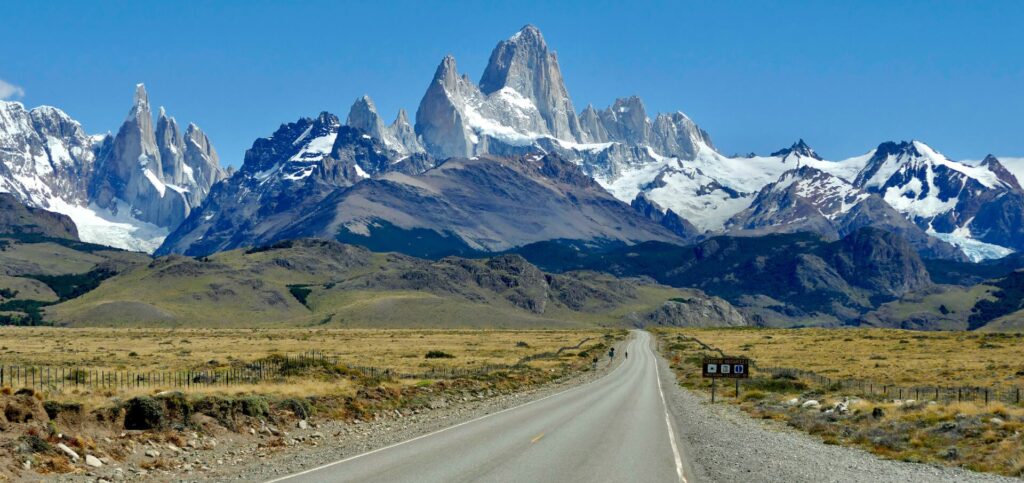
El Chalten (Argentina)
If Torres del Paine is the crown jewel, El Chalten is the hidden gem. This tiny village at the base of Mount Fitz Roy is Argentina’s trekking capital and arguably offers better value for money than its Chilean neighbour. Unlike Torres del Paine, hiking here is completely free, camping is free, and the trails are just as spectacular.
The town itself has a frontier feel with a mix of hostels, mountain lodges, craft beer bars, and outdoor shops. Everyone here is a hiker, and the community vibe is infectious.
How to Get There:
- Bus from El Calafate: 2.5-3 hours, multiple daily departures
- Hitchhike from El Calafate along Ruta 40
Camping: Free campsites at Poincenot and Laguna Capri along the trails. Bring all your own gear.
Punta Arenas (Chile)
Punta Arenas won’t win any beauty contests, but it’s an important logistical hub and has its own charm. The city overlooks the Strait of Magellan and has a fascinating maritime and pioneering history.
Worth Visiting:
- The Nao Victoria Museum (replica historic ships)
- Cemetery with graves of early European settlers
- Seafront promenade
- ATMs that actually work (stock up on cash here)
Ushuaia (Argentina)
The self-proclaimed “End of the World,” Ushuaia sits dramatically between the Beagle Channel and the snow-capped Martial Mountains. It’s remote, expensive, and absolutely worth it.
How to Get There:
- Fly from Buenos Aires (3.5 hours)
- Fly from El Calafate (1 hour)
- Bus from Punta Arenas (12 hours including ferry crossing)
Don’t Miss:
- Tierra del Fuego National Park
- Beagle Channel boat trips to see sea lions, penguins, and the iconic Les Eclaireurs lighthouse
- Laguna Esmeralda hike
- Trying centolla (king crab) at the waterfront restaurants
Top Places To Visit In Argentina
The Hikes: From Easy Strolls to Epic Challenges
Easy Walks
Mirador Condor (Torres del Paine): 45 minutes each way from either Hosteria Pehoe or Camping Pehoe. Stunning viewpoint overlooking the Cuernos and Lakes Pehoe and Nordenskjold. Extremely windy but worth every gust.
Salto Grande (Torres del Paine): 30-minute return walk from the car park to a powerful waterfall connecting two lakes. Wheelchair accessible boardwalk.
Laguna Torre (El Chalten): 3-hour return, mostly flat, suitable for beginners. Views of Cerro Torre’s granite spires and the glacier-fed lagoon. Can get muddy after rain.
Costanera Trail (Tierra del Fuego National Park): Flat coastal walk with views across the Beagle Channel. Several access points from the park road.
Moderate Walks
Mirador de los Cuernos (Torres del Paine): Part of the W Trek but can be done as a day hike. 4-5 hours return with moderate elevation gain. Epic views of the Cuernos.
Cerro Torre to Mirador Maestri (El Chalten): Extension of Laguna Torre. Add an extra 1.5 hours for a higher viewpoint.
Laguna Esmeralda (Ushuaia): 5-hour return through forest and peat bogs to an impossibly turquoise glacial lagoon. Trail can be very muddy, waterproof boots essential.
Martial Glacier (Ushuaia): 2-3 hours return from the chairlift station. Steep but rewarding views over Ushuaia and the Beagle Channel.
Best Moderate Hiking Routes in Nepal: Epic Adventures Without the Extremes
Hard Walks
Laguna de los Tres (Mount Fitz Roy, El Chalten): 20-22km return, 8-10 hours, 860m elevation gain. The final ascent to the viewpoint is a brutal scramble over loose boulders, but seeing Fitz Roy reflected in the glacial lagoon makes it worthwhile. Start early (5-6am) to beat the crowds and see sunrise.
W Trek (Torres del Paine): 4-5 days, approximately 70km. The classic Patagonian trek visiting Grey Glacier, French Valley, and Las Torres viewpoint. Requires advance booking for campsites/refugios and costs £200-400 depending on camping vs refugios. All trails are well-marked.
O Circuit (Torres del Paine): 8-9 days, 120km. The full loop around the Paine Massif, including the remote backside and John Gardner Pass. More challenging and expensive than the W.
Base de las Torres (Torres del Paine): 22km return, 7-9 hours, as a standalone day hike. The park’s most famous viewpoint. Very popular so expect crowds, especially near the iconic towers themselves.
Loma del Pliegue Tumbado (El Chalten): 22km return, 8-9 hours, 1,100m elevation gain. The highest and hardest day hike near El Chalten, offering panoramic views of the entire Fitz Roy range.
Huemul Circuit (El Chalten): 4 days, 60km. Remote wilderness circuit requiring river crossings and glacier walking. Only for experienced, well-equipped hikers.
Organised Tours vs Independent Travel
Organised Tours:
Pros:
- Everything arranged for you (transport, accommodation, meals, guides)
- No stress about bookings or logistics
- Expert local knowledge
- Suitable for limited time frames
Cons:
- Expensive (£1,500+ for W Trek tours)
- Less flexibility
- Potentially larger groups
- The trails are well-marked and busy, making guides unnecessary for most fit travellers
Independent Travel:
Pros:
- Significantly cheaper
- Complete flexibility
- Sense of achievement
- Meet other backpackers
Cons:
- Requires advanced planning and bookings
- You carry everything
- Need to navigate (though trails are well-signposted)
- More logistically complex
For Torres del Paine’s W Trek and El Chalten’s day hikes, independent travel is absolutely feasible and rewarding. The trails are clearly marked, busy with other hikers, and don’t require technical skills. Save your money and do it yourself. However, for more remote routes like the Huemul Circuit or ice trekking on glaciers, a guided tour provides safety and expertise worth paying for.
Getting There and Getting Around
Main Gateway Cities
Punta Arenas (Chile): The largest city in southern Patagonia with an international airport. This is your main entry point if you’re flying into Chilean Patagonia and heading to Torres del Paine.
Puerto Natales (Chile): A smaller town that serves as the jumping-off point for Torres del Paine National Park. About 3.5 hours by bus from Punta Arenas. The vibe here is laid-back and traveller-friendly, with plenty of hostels, gear shops, and tour agencies.
El Calafate (Argentina): Your gateway to the Argentine side, with good flight connections to Buenos Aires. From here, you can visit the famous Perito Moreno Glacier and catch buses to El Chalten.
El Chalten (Argentina): Argentina’s trekking capital, a small mountain village at the base of Mount Fitz Roy. About 2.5-3 hours by bus from El Calafate.
Ushuaia (Argentina): The world’s southernmost city, located on Tierra del Fuego. Perfect for exploring the end of the world and Tierra del Fuego National Park.
Hiring a Vehicle: Freedom Comes at a Price
If your budget allows, hiring a car in Patagonia offers unparalleled freedom. You can stop at hidden viewpoints, camp in remote spots, and create your own itinerary without being tied to bus schedules.
Where to Hire: The best places to hire vehicles are Punta Arenas, Puerto Natales, or El Calafate. International companies like Europcar, Hertz, and Avis operate here, alongside reputable local firms like LYS Rent a Car, Salfa Rent, and Nunatak.
Essential Considerations:
Manual vs Automatic: Most vehicles in Patagonia are manual transmission. Automatic vehicles are limited and significantly more expensive. If you can’t drive a manual, book well in advance and expect to pay a premium.
Vehicle Type: A standard saloon car is adequate for major routes like Ruta 40 and the roads to Torres del Paine. However, consider a 4×4 or SUV if you’re venturing onto gravel roads or want extra clearance for potholes, especially on the Argentine side where road conditions deteriorate.
Border Crossing Permits: This is crucial. If you plan to cross between Chile and Argentina, you must inform your rental company at least two weeks in advance. They’ll provide a special permit (around £80-100) that allows you to take the vehicle across borders. Without this document, you’ll be turned away at customs. The car should also have an engraved number in the window for Argentine crossings.
Drop-Off Fees: One-way rentals between cities incur massive fees. Santiago to Punta Arenas can cost over £1,200 in drop-off fees alone. It’s often cheaper to do a loop, returning the car to your starting point. For example, rent in Punta Arenas, drive to El Calafate, then return to Punta Arenas.
Insurance: Get comprehensive coverage. Roads can be rough, windshields get cracked by flying stones, and weather conditions can be treacherous. Check if your policy covers gravel roads and make sure you understand the excess.
Fuel: Petrol stations are few and far between. In Chile, expect to pay around £1-1.40 per litre. In Argentina, it’s slightly cheaper at around £0.80-1 per litre. Always fill up when you see a station, even if you’re only half empty. Some remote stations only accept cash, so carry emergency pesos or Chilean pesos.
Age Requirements: Most companies require drivers to be 21 or older, with a full licence held for at least one year. An International Driving Permit may be required if your licence isn’t in Latin characters, though enforcement is inconsistent.
Cost: Expect to pay £250-450 per week for a basic car, £400-700 for an SUV. Add border permits, insurance excess reduction, and fuel, and you’re looking at a significant investment. However, splitting costs between 3-4 travellers makes it remarkably affordable.
Booking: Reserve at least 1-2 months ahead for summer season (December to February) as availability is limited. Read reviews carefully and confirm all details in writing, especially border crossing permissions.
Sample Patagonia Road Trip Itinerary (14 Days)
Day 1-2: Arrive in Punta Arenas Pick up rental car, stock up on supplies, explore the city’s maritime history.
Day 3-5: Puerto Natales and Torres del Paine Base yourself in Puerto Natales. Day trips into Torres del Paine for easy walks like Mirador Condor and Salto Grande waterfall.
Day 6-8: Torres del Paine Multi-Day Trek Either the W Trek (4-5 days, camping required) or selected day hikes from different access points.
Day 9: Drive to El Calafate (5-6 hours) Cross the border early. Stop at viewpoints along the way.
Day 10: Perito Moreno Glacier Day trip to witness this massive glacier. Take the boat trip to get up close.
Day 11-13: El Chalten Day hikes to Laguna de los Tres (Fitz Roy), Laguna Torre, and Loma del Pliegue Tumbado.
Day 14: Return to Punta Arenas or El Calafate Long drive back or drop car and fly out.
This itinerary can be extended by adding Ushuaia (requires 12-hour drive from Punta Arenas or a flight from El Calafate).
Bus Routes: The Budget Traveller’s Lifeline
Buses are the most economical way to travel Patagonia, and the network is surprisingly comprehensive. Companies like Bus-Sur, Cootra, and Turibus connect all major destinations.
Key Routes:
- Punta Arenas to Puerto Natales: 3-3.5 hours, multiple daily departures
- Puerto Natales to Torres del Paine (Laguna Amarga): 1.5-2 hours, several daily buses
- El Calafate to El Chalten: 2.5-3 hours, daily departures
- Punta Arenas to Ushuaia: 12 hours including ferry crossing
- El Calafate to Puerto Natales: 5-6 hours (crosses Chile-Argentina border)
Top Tips for Bus Travel:
- Book tickets in advance during peak season (December to February)
- Bring snacks and water as services can be limited
- Dress in layers as buses can be freezing or sweltering
- Keep your passport handy for border crossings
- Some routes like Puerto Natales to El Calafate require clearing two borders (Chile exit, Argentina entry)
Expect to pay around £20-40 for most inter-city routes. Purchase tickets online through companies’ websites or at bus terminals, which usually have English-speaking staff.
Hitchhiking: Free Rides Through Paradise
Hitchhiking is surprisingly common and relatively safe in Patagonia, particularly on routes like Ruta 40 in Argentina and the roads around Torres del Paine. The sparse population and limited public transport mean locals and fellow travellers are often willing to give lifts.
I hitched from Puerto Natales towards Torres del Paine and got picked up by a Chilean family heading to a campsite. We shared mate and conversation for two hours whilst dodging guanacos on the road. That said, hitchhiking requires patience, especially in shoulder seasons when traffic is light.
Hitchhiking Tips:
- Start early in the morning when traffic is heaviest
- Stand at petrol stations or obvious pull-off points
- Make a cardboard sign with your destination
- Always trust your instincts and never get in a vehicle if you feel uncomfortable
- Solo female travellers should exercise extra caution
- Have a backup plan as you might wait hours for a lift
- Expect long waits on remote stretches like the Carretera Austral
Safety Considerations
Patagonia’s weather is notoriously unpredictable and can turn dangerous quickly. Respect the mountains and be prepared.
Weather:
- Expect four seasons in one day
- Wind is constant and can exceed 100 km/h
- Summer temperatures range from 5-20°C
- Sudden rain, hail, or even snow in summer
- Always check forecasts before setting out
- If conditions deteriorate, turn back
Essential Gear:
- Quality waterproof jacket (not water-resistant, waterproof)
- Insulating layers (fleece or down)
- Waterproof trousers
- Warm hat and gloves
- Sunglasses and sunscreen (UV is intense)
- Trekking poles for stability in high winds
- Water purification tablets (though most streams are drinkable)
- Headlamp
- First aid kit
- Emergency whistle
- Offline maps downloaded to your phone
Travel Packing List: What To Take Backpacking Around The World
Wildlife:
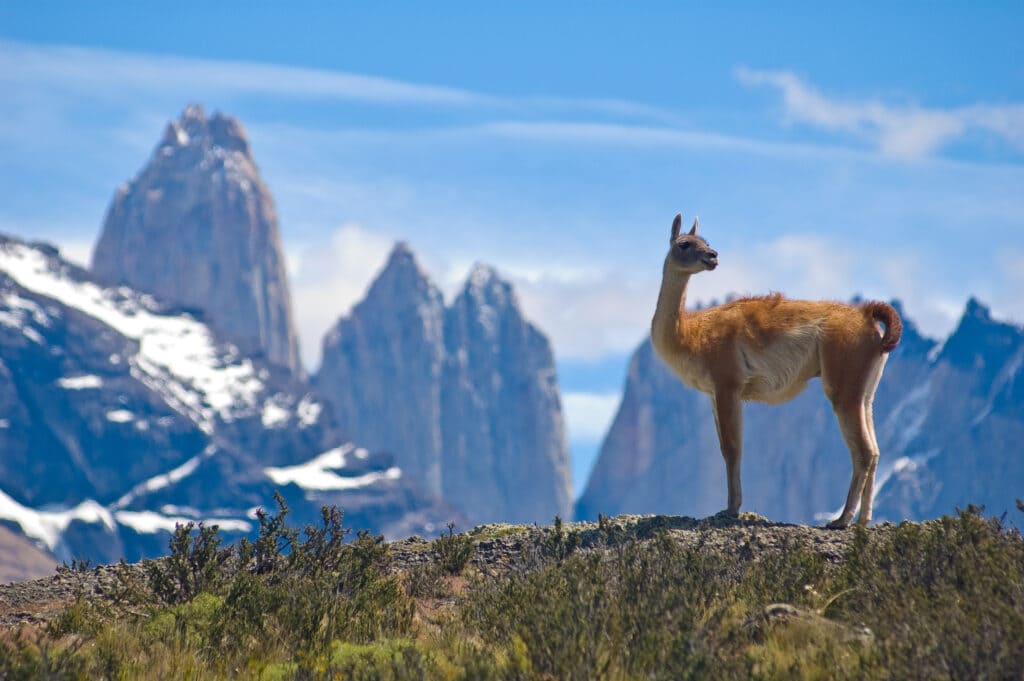
- Guanacos are common and harmless but can kick if cornered
- Pumas exist but sightings are rare; make noise whilst hiking
- Don’t approach or feed any wildlife
- Be aware of nesting birds, especially skuas, which can dive-bomb if you get too close
Navigation:
- Download offline maps
- Carry a paper map as backup
- Trails are generally well-marked with cairns and posts
- In poor visibility, don’t hesitate to turn back
Physical Preparation:
- Multi-day treks require good fitness
- Train with a loaded backpack before arriving
- Break in hiking boots to avoid blisters
- Stay hydrated and eat regularly
- Know your limits and don’t push through pain
Water:
- Most streams in the national parks are safe to drink
- Use purification if unsure or near livestock areas
- Carry at least 1-2 litres depending on the hike
Emergency Contacts:
- Chile emergency: 131 (ambulance), 133 (police)
- Argentina emergency: 107 (ambulance), 101 (police)
- Park ranger stations have radios and first aid
- Mobile coverage is limited; don’t rely on it
Travel Safety and Security Tips
Booking Accommodation: Torres del Paine campsites book out 6-12 months in advance for peak season. Use websites like Torres Hike or Booking Patagonia to simplify the process, or book directly through Vertice Patagonia and Las Torres. CONAF campsites (Chilean park authority) are currently closed as of 2025-2026 season.
Money: ATMs are scarce and unreliable, especially in El Chalten where machines frequently run out of cash. Withdraw plenty in major cities (Punta Arenas, Puerto Natales, El Calafate, Ushuaia). Carry emergency cash in both Chilean pesos and Argentine pesos.
How to Withdraw or Obtain Argentine Pesos: A Traveller’s Guide
Final Thoughts
Patagonia isn’t a cheap destination, but it’s one of those places that justifies every pound spent. Whether you’re watching ice calve off a glacier, scrambling up to a mountain lagoon at dawn, or sharing mate with a stranger who gave you a lift, this region will challenge you, exhaust you, and leave you desperate to return.
My advice? Give yourself more time than you think you need. Weather delays are common, buses break down, and some days you’ll simply want to stay an extra night because the light hitting the mountains is too beautiful to leave. Patagonia operates on its own schedule, and the best experiences come when you’re flexible enough to embrace the unexpected.
Pack the right gear, respect the environment, and prepare to be humbled by one of the planet’s last true wilderness areas. The end of the world is waiting.
By adding us a preferred source you'll see Backpacker Advice more often in your Google searches.